Hey HVAC techs! I’m Greg Fox, and today we’re going to talk about adding more refrigerant to an air conditioner. I wanted to expand on our recent AC troubleshooting series by going into each part of its sequence of operations. This week, it’s the refrigerant.
Now, I’m not going to get into the legalities and moral issues here of refilling refrigerant on a system that is leaking, but you should know a few things:
- Refrigerant is expensive for the customer – If you have to keep refilling their refrigerant, which we do not know how often that will be, it can add up quickly.
- They know their air conditioner better than us. If we’ve never been to their home to refill their refrigerant before, there’s no reference for knowing how BIG their refrigerant leak is or WHERE the leak is.
- The customer could lose all of their refrigerant tomorrow if they have a significant leak… or if it is a small leak, the refrigerant could last them all year or longer.
Let’s go over some basics to charging an air conditioner on your average 90-degree day in the middle of summer. Upon arrival at the house, your customer tells you the air conditioner worked just fine last year, but this year the system seems to run non-stop, especially as the summer days get hotter and hotter. You ask the customer, “Have any other technicians been out to make repairs on your system since last year?” It’s very likely the customer will say no.
There’s a lot of things that can affect the refrigerant charge. Just remember, for the sake of time, we’re keeping this dialogue short, so we can get to the point of charging the system up.
I like what Bryan Orr mentioned in an article I read. He said,
“We need to set up equipment so that it won’t freeze during normal operating conditions. At the very least, the typical residential A/C system should be set up so that the return air temp can get all the way down to 68° and still be just above freezing at the evaporator coil.
Let’s say it’s 78° in a house on an R410a system, and your suction pressure is 108 PSI. That means your suction saturation (coil temperature) is 35°… so the coil won’t freeze.
However, the coil temperature will drop approximately 1° for every degree the return temperature drops.
Remember, at 78° inside, the evap coil was at 35°, So if the customer sets it down to 74°, the saturation would get down to 31°, and the will start to freeze.
Knowing this, let’s grab your temperature probe and check the return air and the supply air. Here you notice the difference between the two is about 8 degrees. As a tech, you know the split should be around 18 to 22 degrees.
Next, you head outside and feel the suction line to see if it’s cold. Now, there is some validity to the old term, “beer can cold” but it should not be the measure you go by to check the refrigerant charge. It can, however, give you a clue as to the condition of the system. In this case, the suction line at the AC is barely cold. Now, I’m not always a huge proponent of hooking my gauges up to a system every time I go out to diagnose a system, but in this case, we can tell something’s not right with the cooling system, so in this case, I want to see what is going on inside of it.
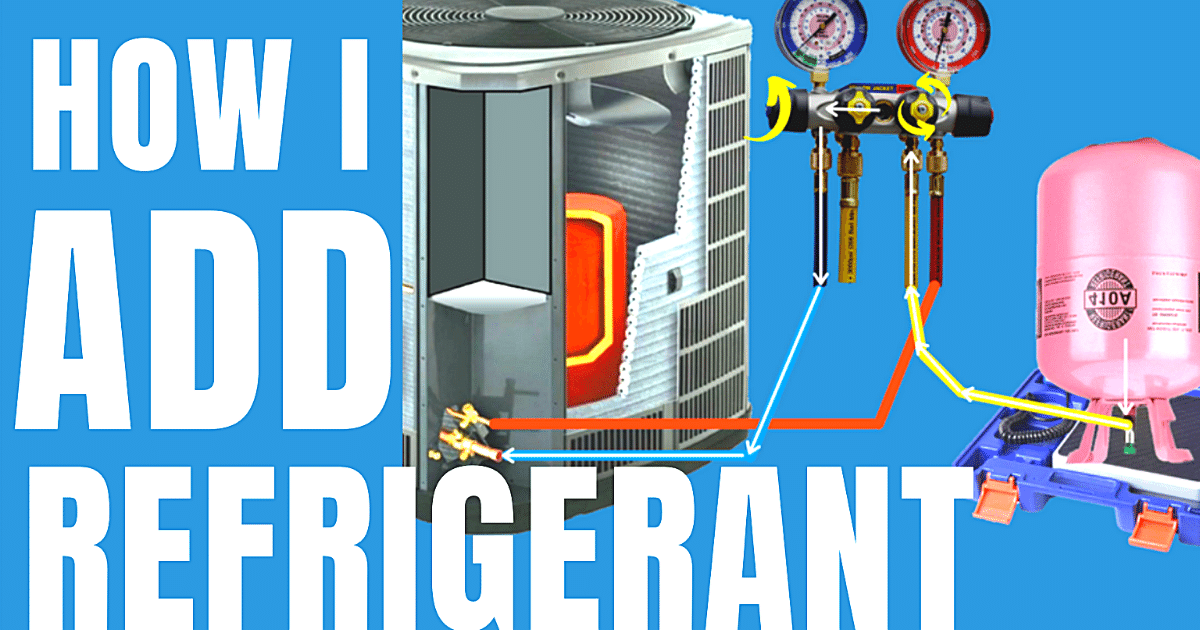
Hook your hoses up to the liquid and suction lines. Be careful of blowback so you don’t freeze your hands. Follow all safety precautions.
Now, what do you see on your suction side? I like my techs to talk to me about the evaporator coil’s TEMPERATURE and the TEMPERATURE of the condenser coil. When I’m on the phone trying to help a tech out in the field, it’s hard for me to remember all the pressure-temperature ratios between the different refrigerants we use.
So if someone tells me the evaporator coil is 40 degrees, I can immediately tell the coil is not freezing. If someone tells me the temperature of the condenser coil is 140 degrees, I can immediately translate that to an outdoor coil that is under some seriously high pressure.
On the refrigerant gauge, the outer circle and those numbers are the pressures. The inner rings of numbers reflect the temperature. This is how I want my techs to communicate pressures to each other. It’s more efficient this way. Most gauges these days have a green ring for R22 and a pink ring for R410. The pink ring’s numbers are what we are using for evap and condenser coil temperatures on a 410 system.
Here we see that the evaporator coil is at about 20° F. For proper refrigerant levels, the image I want you to project in your mind is this. Our end-goal here is to have liquid refrigerant reach all the way to the TXV at the evaporator coil to meter the refrigerant appropriately. Right now, there’s not enough liquid in the system to do that. This means vapor is making its way to the metering device, and we’re not giving the coil enough refrigerant to interact with the speed of the blower air moving across it.
We need the perfect balance of airflow and refrigerant pressures to create that 18 to 22-degree temperature split we are looking for.
Let’s suppose this system holds 10lbs or R-410a. In my mind, I’m thinking the system is about halfway charged. It’s an approximation, but we have to let the customer know about how many pounds we want to add, so they give you the okay to move forward. Of course, you don’t know for sure, but they should be aware it could be around 5 lbs, and that will cost (whatever, $100 a pound). We need to let them know it could be a couple of pounds more or a couple of pounds less, but either way, we need permission to move forward.
Using a scale is the only way we can know for sure how many pounds of refrigerant we are adding. And it’s cool to let the customer know you’ll be using this too. It’s reassuring to them. This is great for preventing you from overcharging the system too.
My service hoses are already hooked up. I’m going to start by putting my charging hose on the tank of refrigerant. Next, I open the refrigerant tank valve and place it upside down on the scale. With the gauges closed on the manifold, I crack open the connection where the charging hose meets the manifold. Not too much, though. We just want the refrigerant to prime itself up to that point so we get rid of excess moisture and air in the hoses.
Reset the scale back to zero, so we know how much we are adding as the refrigerant enters the system.
I recommend you put an amp clamp on one of the wires leading to the compressor. If you’ve seen my video on diagnosing a bad compressor, you know that the compressor’s amp draw correlates with the refrigerant pressures inside the system. The healthiest compressors will run at around 60 percent of their RLA. When you’re charging up the system, you’ll see the amp draws fluctuate as the refrigerant goes in and settles down. Use your knowledge about the compressor amp draws to monitor your charging process.
Okay! We’re ready to charge! With the charging hose valve open, we’ll start opening the suction side valve. A quarter to half of a turn is enough. There is no approximate amount of time it’ll take to insert 1 lb. of refrigerant. Each situation is different. To know for sure, use your scale.
In this situation where we think the system is about 4 or 5 lbs low, let about 2 lbs flow into the system and wait for 5 to 10 minutes for the system to equalize. Question. How long does it take for the refrigerant to cycle through a typical residential split system? I’d say about 3 or 4 minutes. If you have a different answer, let me know in the comments.
So we see now the low side has come up to about 27 degrees or 92 psi. Our evaporator coil is still freezing. Let’s add two more pounds and wait. I know there’s a lot of pressure on techs to get their calls done quickly so they can get to the next one, but it’s essential to let the system stabilize before adding more refrigerant. If you add too much, too soon, you could see the pressures skyrocket insanely fast. And now you have to recover some refrigerant into a separate tank which takes even more time!
Now we are getting close to 32 degrees or about 100 psi on the suction side. From here, we want to start dialing our subcool to whatever it is the manufacturer recommends. This system says 10 degrees subcooling on a 95-degree day. Let’s get a temperature probe on the liquid line and start getting our reading from it. We’re going to be subtracting the high side’s temperature and the liquid line’s temperature to come up with our subcooling.
Add refrigerant a little at a time until the difference between those two numbers is 10 degrees. There’s nothing tricky about this. Just don’t add too much too fast. Add refrigerant and wait for the numbers to stabilize.
You’re going to be looking for the low side pressure to be around 40 to 42 degrees or 125 psi. The high side pressure/temperature will likely settle around 15 degrees above the outdoor temperature. So on a 90-degree day, you may end up with a high side temperature around 105 degrees. If you can get your numbers around this area, you’re close! But let’s really get it dialed in. Get that subcool to 10, plus or minus 2 degrees.
I will tell you; it takes longer to move the needle on your gauges when there’s less refrigerant in the system. As the system starts getting close to the proper subcool, you’ll want to finesse the time you keep the manifold open, allowing refrigerant into the system. Overcharging can happen quickly, especially on a hot day.
Getting close to your 10 degrees subcool? Cool!
Once you get it to this point, check your temperature split inside. Is it around 18 to 22 degrees? Great! You’ll notice the liquid line is a little bit warmer than the outdoor temperature. Also, the suction line will be damn near “beer can cold!”
Test the system while it’s running. Get your amp draws on the condenser fan motor and compressor. Cycle the system on and off at the thermostat to make sure the system is operating correctly. If it is, you’re good to go.
Well, I hope this has helped you when it comes to the charging process. I make my videos for my technicians to reference when they are in a bind out in the field. But if this can help anyone else, that’s great.
Thanks so much for reading, and we’ll see you on the next blog.


